How to configure your email client. Modified on: 2013-09-03 20:13:05 -0700
How to configure Outlook Mail
NB: For the examples given below we have used a sample domain (mydomain.com). Please use your own domain name when setting up your email client. The settings apply to all other email clients, and the configuration should be very similar to the one described below.
How to configure Outlook
1. Go to 'Tools' > 'Email accounts'
2. Select 'Add a new e-mail account' and click on 'Next'
3. Select either 'POP3' or 'IMAP' (whichever you prefer) and click 'Next'
4. Fill in all the fields as follows:
• Your Name: enter your name as you want it to appear in your emails
• E-mail Address: your email address
• Incoming mail server: pop.mydomain.com if you are using POP3 / imap.mydomain.com if you are using IMAP
( remember to replace 'mydomain.com' with your own domain name)
• Outgoing mail server: smtp.mydomain.com (replace 'mydomain.com' with your own domain name)
• Username: your full email address
• Password: whichever password that was entered when creating the mailbox
NB: make sure that the box 'Log on using Secure Password Authentication (SPA) is unchecked.
Then click on 'More Settings'
6. Go to the 'Outgoing Server' tab and check mark the box 'My outgoing server (SMTP) requires authentication' and select the option 'Use same settings as my incoming mail server'
7. Go to the Advanced tab, and under the 'Delivery' section check mark the box 'Leave a copy of messages on the server'.
NB: Check that the ports as set as follows:
• Incoming server (POP3): 110
• uncheck the box: 'This server requires an encrypted connection (SSL)
• Outgoing server (SMTP): 25
• uncheck the box: 'This server requires an encrypted connection (SSL)
Click on 'Ok' and then 'Next'
8. Click on 'Finish' to complete the configuration. You will now be able to send and receive emails using your own mailbox.
How to configure Windows Live Mail
1. Click on 'Add email account'
2. Fill in all the fields as follows:
• E-mail address: your email address
• Password: whichever password that was entered when creating the mailbox (check mark 'Remember password')
• Display Name: enter your name as you want it to appear in your emails
• Check mark the box 'Manually configure server settings for e-mail account'
Then click on 'Next'
3. Select either 'POP3' or 'IMAP', whichever you want to use
Fill in the fields as follow:
• Incoming server: pop.mydomain.com if you are using POP3 / imap.mydomain.com if you are using IMAP
(remember to replace 'mydomain.com' with your own domain name) / Port : 110
• Uncheck the box 'This server requires a secure connection (SSL)'
• Log on using: Clear text authentication
• Login ID: your full email address
• Outgoing server: smtp.mydomain.com (replace 'mydomain.com' with your own domain name) / Port: 25
• Check mark the box 'My outgoing server requires authentication'
Click on 'Next'
4. Click on 'Finish' to complete the configuration. You will now be able to send and receive emails using your own mailbox.
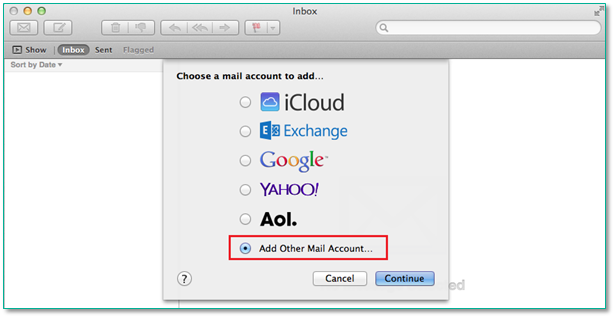
Open up Mac Mail and you should be presented with the screen below (If not, then click ‘File’ and ‘Add new account’) – just select ‘Add Other Mail Account…’ and click ‘Continue’
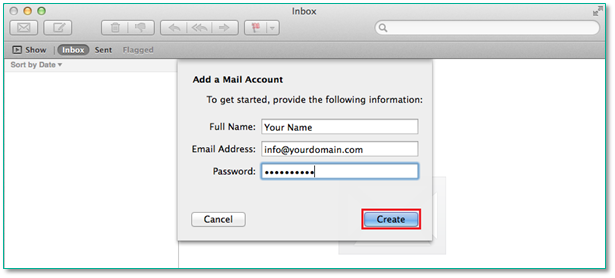
Fill in your details, then click ‘Create’:
Full Name: This should be the name you want your emails to appear to have been sent from
Email Address: Once you have setup your mailbox you put the full email address in here
Password: This is the password you used when the mailbox was created
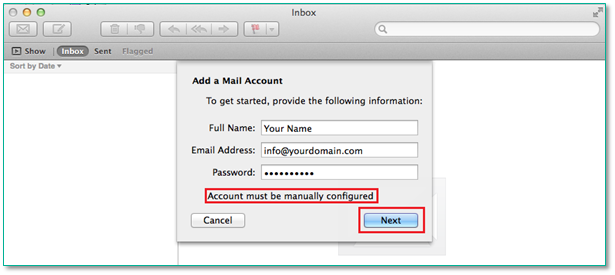
You will see a message ‘Account must be manually configured’, just click ‘Next’ to carry on.
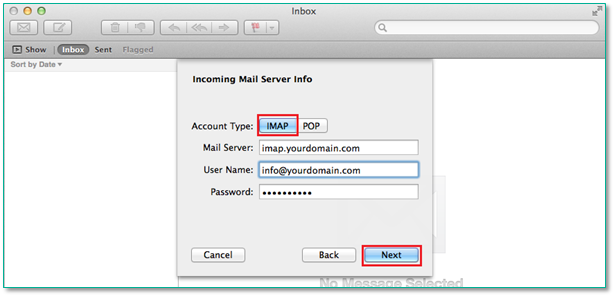
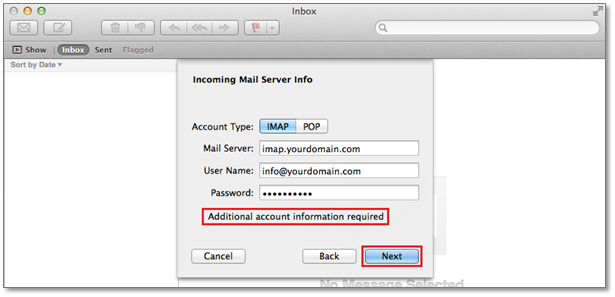
First you will need to complete the ‘Incoming Mail Server Info’ using the following information:
*Account Type: *IMAP / POP
Mail Server:
If you selected ‘Account type’ as IMAP: imap.yourdomain.com
If you selected ‘Account type’ as POP: pop.yourdomain.com
Username: Enter the full email address for your selected mailbox (e.g. [email protected])
Password: This is the password you used to when the mailbox was created
A message is displayed that says ‘Additional account information required’, just click ‘Next’.
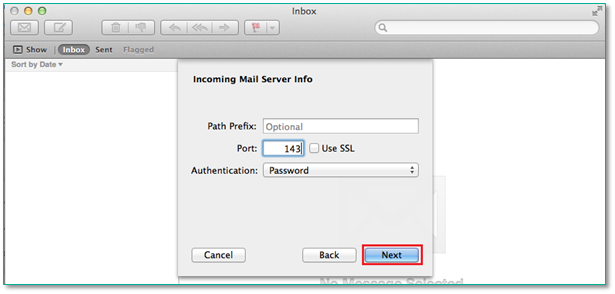
Fill out the ‘Incoming Mail Server Info’ using this information:
If you selected ‘Account type’ as IMAP: Enter 143 in the ‘Port:’ field (993 if using SSL)
If you selected ‘Account type’ as POP: Enter 110 in the ‘Port:’ field (995 if using SSL)
Select the ‘Authentication:’ field as ‘Password’. Then click ‘Next’.
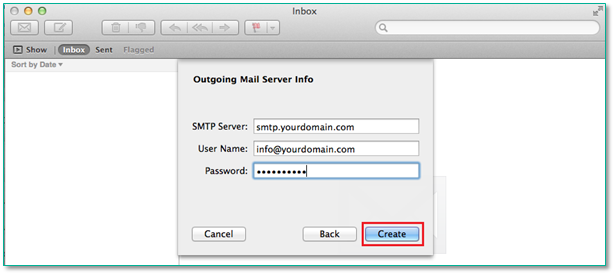
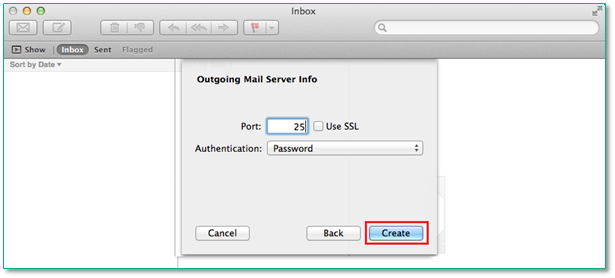
Now you will need to complete the ‘Outgoing Mail Server Info’ with the following information, then click ‘Create’.
SMTP Server: smtp.yourdomain.com
Username: Enter the full email address for your selected mailbox
Password: This is the password you used to when the mailbox was created
You guessed it, at this stage Mac mail will require more information – just click ‘Next’.
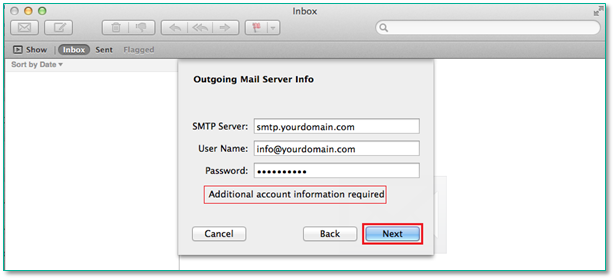
Now all you need to do is enter the outgoing ‘Port’ as 25 (465 **if using SSL)** then click ‘Create’
Your mail should now be delivered directly to the Mac Mail application.
If you run into any errors, it is worth substituting your outgoing and incoming servers with the following information, and then have another try.
Incoming mail server: mail.gandi.net
If you selected ‘Account type’ as IMAP: Enter 143 in the ‘Port:’ field (993 if using SSL)
If you selected ‘Account type’ as POP: Enter 110 in the ‘Port:’ field (995 if using SSL)
Outgoing mail server: mail.gandi.net
Use port 25 (465 if using SSL)
Email setup for iphone. Modified on: 2013-08-30 21:45:45 -0700
1. go to "Settings", then
2. "Mail, Contacts, Calendars", then
3. Click "Add Account…"
4. Choose "Other"
5. select "Add Mail Account" under "Mail"
Here, you will just enter the information as requested. An example is shown below, you will need to replace them with your own:
Name: Jon Doe
Email Address: [email protected]
Password: yourpasswd
Description: will be filled in automatically, but can be anything
6. click "Next"
7. Choose POP
Instructions for POP
Incoming Mail Server
Host Name: pop.mydomain.com
User Name: [email protected]
Password: yourpasswd
Outgoing Mail Server
Host Name: smtp.mydomain.com
Username: [email protected]
Password: yourpasswd
8. click "Save".
iPhone Guide
POP Account Information:
• Name = what ever you want to call this account [e.g. your name, work, website]
• Email Address = same as username above [your full mailbox address]
• Description = you can use the same as above [e.g. your name, work, website]
Incoming Mail Server:
• Host Name = pop.mydomain.com
• User Name = your full mailbox address [[email protected]]
• Password = as above - what ever you set up on your email account
Outgoing Mail Server:
SMTP = smtp.mydomain.com
(SMTP):
Primary Server:
smtp.mydomain.com = ON
Server = ON
Outgoing Mail Server:
Host Name = smtp.mydomain.com
User Name = your full mailbox address e.g. [email protected]
Password = what ever you set/same password for email account
Use SSL = ON
Authentication = Password
Port = 465
Incoming Settings:
Use SSl = OFF
Authentication = Password
Delete from server = Choose option: WHEN REMOVED FROM INBOX
Server Port = 110
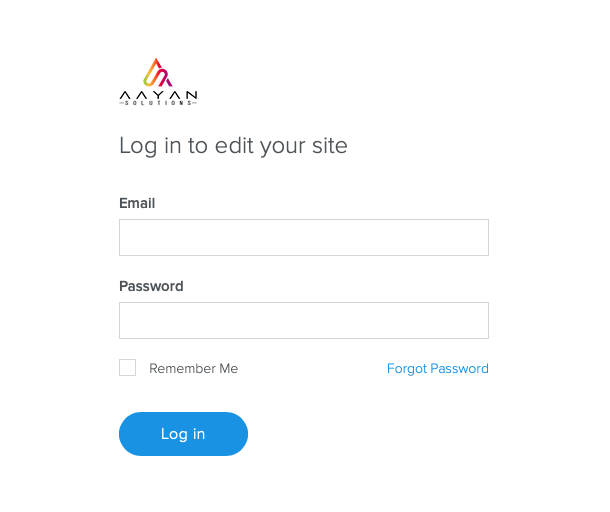
To login into your website editor it's very simple, just type in your website url Example: http://www.mydomain.com/login
This url will take you to our client login page. Just type in your email that is assigned to your website editor and your password and click Log in.